cwag911
Moderator
It is easy............................unless you miss.You make it sound easy. Thank you!

Follow along with the video below to see how to install our site as a web app on your home screen.
Note: This feature may not be available in some browsers.
It is easy............................unless you miss.You make it sound easy. Thank you!
I am new to owning a boat/Tritoon, so docking our boat on our 3 toon cradle lift is intimidating. However, you don’t really dock “into” the three cradles. You have the lift all the way down, and really are just coming in between the support rails for the canopy. When you raise the lift the pontoon pretty much “settles” into the cradles on its own.
The tough part is docking between the outside canopy supports, which I am assuming would be the same challenge with any tritoon style lift. That’s the challenging part.
Hydro Hoist! Works great up to 8000 lbs without cables.What is everyone doing for a boat lift for their Bennington since Bennington says the toons have to be supported on 2/3 or more of the toons?

We have a Shore Station 6000 lb vertical lift, (not a pontoon length) Very happy with it.What is everyone doing for a boat lift for their Bennington since Bennington says the toons have to be supported on 2/3 or more of the toons?
For some strange reason, I could not post using my iPad as I sat on my dock admiring the completion of my "boat lift mods."
But my desktop works fine so here we go.
Thanks to Bennington's technical documentation (to wit a PDF file on the spacing dimensions and seperation distance of the tritoons) AND to the wonderful patience and support of my local dealer (WAY TO GO Ocean Marine Ocean Speings=WTGOMOS, MS!!), I was able to practice an old Navy engineering habit: "you get what you INSPECT, not what you EXPECT."
Accordingly, I was able to physically VERIFY the dimensions provided on Bennington's PDF (they ARE ACCURATE).
Being a little bit "SCOT-ish," I was not willing to fall on the latter side of a "make-buy decision."
Again, with wonderful help from my dealer (WTGOMOS), they arranged for me to purchase thru them and pick up on my car-carrier trailer some 5" marine grade aluminnum "C-channel" used by a local custom trailer manufacturer way over on the west side of Mississippi's HW 90 close to the Louisisiana state line. This trailer maker even cut the standard length 25 ft pieces for me so that I had three clean cut foundation pieces along with 3 pieces of scrap.
I subsequently made 12 cuts of my own on the scrap pieces making the necessary braces to clamp the tritoon bunks to the main frame of my boat lift. Those cuts required 12 (I say again 12 as in ONE EACH), "saws all" metal blades. Turns out that marine grade aluminum (6000 series) is pretty tough and strong. By the time I had cut thru the second (last) thick portion of the 5" C-channel, the teeth on the blade were GONE or filled with melted aluminum "saw dust."
As Rear Admiral Fiske once told me, "look CDR, it couldn't have been that hard because YOU did it and YOU are NOT that good." So let me quickly stipulate that any one of YOU can do this if you own a tape measure, wrenches and a saws all.
It was tedious but not hard.
Hoping to basically replicate the Road King Trailer bunks, I looked into buying the same PVC material which is used to "slick top" the bunk pads. Again, due to my "SCOT-ish" habits, I passed on paying nearly $600 for that exact material. Instead, I used PVC door jam purchased from Home Depot. I had to drive to Alabama to buy additional 10 foot sections because my local Mississippi Home Depot was not due to restock those lengths till APRIL! The boat may be here by then. Total cost for the Home Depot PVC door jam pieces: < $200.
Gathering the raw materials took me 5 days longer than building/assembling/installing the bunks, 15 days versus 10.
Most difficult was finding the proper SS hardware whose male threads matched the female nut threads. !@%$#@*&^$ is all I'm gonna say about that.
After 4 sets of rejected nuts & bolts, I finally found that 1/2" X 3" carriage bolts fit perfectly into the tritoon bunk pad galvanized braces which have exactly that dimension (1/2") to properly seat the carriage bolt's head securely.
While the elapsed time it took me to start and complete this project was 15 + 10 days, I estimate that it took me 80-100 hours to find and obtain material while the actual work to assemble and install only took me ten 5-hour days.
The most challenging (but also exciting to COMPLETE) obstacle was wrestling (wrangling?) the completed bunks which weigh over 100# each (close to 130#) onto the boat lift using the old V-hull bunks as a fulcrum while balancing myself on a swinging boat lift frame. Periodically, I had to violate the "one hand for the man, one hand for the ship" as boatswain mates would say, and act like a NY City sky scraper monkey to move the assembled bunks another inch or so.
Those of you without varsity trampoline and spring board diving skills along with aerobatic flying may want to use a chain fall or several neighbors but YOU can STILL DO IT.View attachment 21705
Looks like you used 2x6? I'm trying the same configuration showed here but with a carpet covering. Just wanted to confirm that 2x6 sitting on 3-v shaped brackets was safe. Thank you!For some strange reason, I could not post using my iPad as I sat on my dock admiring the completion of my "boat lift mods."
But my desktop works fine so here we go.
Thanks to Bennington's technical documentation (to wit a PDF file on the spacing dimensions and seperation distance of the tritoons) AND to the wonderful patience and support of my local dealer (WAY TO GO Ocean Marine Ocean Speings=WTGOMOS, MS!!), I was able to practice an old Navy engineering habit: "you get what you INSPECT, not what you EXPECT."
Accordingly, I was able to physically VERIFY the dimensions provided on Bennington's PDF (they ARE ACCURATE).
Being a little bit "SCOT-ish," I was not willing to fall on the latter side of a "make-buy decision."
Again, with wonderful help from my dealer (WTGOMOS), they arranged for me to purchase thru them and pick up on my car-carrier trailer some 5" marine grade aluminnum "C-channel" used by a local custom trailer manufacturer way over on the west side of Mississippi's HW 90 close to the Louisisiana state line. This trailer maker even cut the standard length 25 ft pieces for me so that I had three clean cut foundation pieces along with 3 pieces of scrap.
I subsequently made 12 cuts of my own on the scrap pieces making the necessary braces to clamp the tritoon bunks to the main frame of my boat lift. Those cuts required 12 (I say again 12 as in ONE EACH), "saws all" metal blades. Turns out that marine grade aluminum (6000 series) is pretty tough and strong. By the time I had cut thru the second (last) thick portion of the 5" C-channel, the teeth on the blade were GONE or filled with melted aluminum "saw dust."
As Rear Admiral Fiske once told me, "look CDR, it couldn't have been that hard because YOU did it and YOU are NOT that good." So let me quickly stipulate that any one of YOU can do this if you own a tape measure, wrenches and a saws all.
It was tedious but not hard.
Hoping to basically replicate the Road King Trailer bunks, I looked into buying the same PVC material which is used to "slick top" the bunk pads. Again, due to my "SCOT-ish" habits, I passed on paying nearly $600 for that exact material. Instead, I used PVC door jam purchased from Home Depot. I had to drive to Alabama to buy additional 10 foot sections because my local Mississippi Home Depot was not due to restock those lengths till APRIL! The boat may be here by then. Total cost for the Home Depot PVC door jam pieces: < $200.
Gathering the raw materials took me 5 days longer than building/assembling/installing the bunks, 15 days versus 10.
Most difficult was finding the proper SS hardware whose male threads matched the female nut threads. !@%$#@*&^$ is all I'm gonna say about that.
After 4 sets of rejected nuts & bolts, I finally found that 1/2" X 3" carriage bolts fit perfectly into the tritoon bunk pad galvanized braces which have exactly that dimension (1/2") to properly seat the carriage bolt's head securely.
While the elapsed time it took me to start and complete this project was 15 + 10 days, I estimate that it took me 80-100 hours to find and obtain material while the actual work to assemble and install only took me ten 5-hour days.
The most challenging (but also exciting to COMPLETE) obstacle was wrestling (wrangling?) the completed bunks which weigh over 100# each (close to 130#) onto the boat lift using the old V-hull bunks as a fulcrum while balancing myself on a swinging boat lift frame. Periodically, I had to violate the "one hand for the man, one hand for the ship" as boatswain mates would say, and act like a NY City sky scraper monkey to move the assembled bunks another inch or so.
Those of you without varsity trampoline and spring board diving skills along with aerobatic flying may want to use a chain fall or several neighbors but YOU can STILL DO IT.View attachment 21705
The person you were replying to hasn’t logged into the forum since March of 2018. You are unlikely to get an answer from them. Sorry…Looks like you used 2x6? I'm trying the same configuration showed here but with a carpet covering. Just wanted to confirm that 2x6 sitting on 3-v shaped brackets was safe. Thank you!
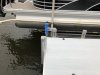
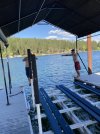
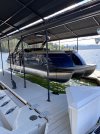
I don’t know if this will help but here are pictures of my lift.Any insights for me?

Personally, not from a technical perspective. I am hoping others with technical knowledge will chime in.Any insights for me?
The lift, slip, roof set up and of course your boat all look great Yianni!!! But my big question is .....Does that owl make a good bird deterrent?!? Ha! I've been looking for one.I don’t know if this will help but here are pictures of my lift.
Yianni what about that owl?!? Worth getting 1 or 2 ?!? We had those herons crap on my nice black cover last year and I want to deter them this year.....I don’t know if this will help but here are pictures of my lift.