DaveyJ
Well-Known Member
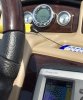
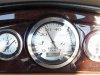
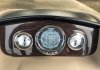
Well I went ahead and replaced my tachometer with a multi-function gauge this weekend. I've posted a couple of times asking questions about this in the past couple of weeks and finally took the plunge. Basically, my boat had a tach with hourmeter, trim gauge and gas gauge. My tach would occasionally show higher than actual RPM's (based on previous experience) which made me look for a better solution. I ended up purchasing a Lowrance LMF-400 multi-function gauge which was a perfect size replacement for my tach. Yamaha outboards (even without Command Link) put out quite of bit of engine data including oil pressure, temp, voltage, hours, etc. via NMEA 2000 network.
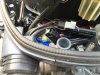
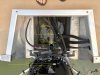
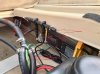
If my chart plotter had been NMEA 2000 compatible, I could have performed this upgrade for around $150 but since I had to buy the gauge, I'm into it around $350. The components needed for the upgrade are the Lowrance Yamaha adapter cable which plugs into the motor and outputs into a standard NMEA 2000 connection and a NMEA 2000 starter kit (these components came with my gauge). There are other nicer multi-function gauges out there but I think the LMF-400 will work for me. People have had issues with the LMF-400 washing out in direct sunlight but I run with the bimini up 95% of the time and my windshield overhangs my instruments by several inches so my instrument panel doesn't see much direct sun. Additionally, since it's in the tach location, I'm looking directly at it. I can see where off angle viewing could be an issue. The toughest part of the install was running the cables under the boat due to limited space and doing the work by myself. One interesting note is I found my motor had about 8 less hours than the meter on the tach showed. Apparently the key had been left on at some point. I took pics of the install below with the components labeled and provided a list of the NMEA 2000 engine data put out by Yamaha outboards. Thanks to tcpip95 for providing additional info on the NMEA 2000 network install. This is a fairly easy inexpensive install for Yamaha outboard owners who want a little more insight into how their engine is running.
If my chart plotter had been NMEA 2000 compatible, I could have performed this upgrade for around $150 but since I had to buy the gauge, I'm into it around $350. The components needed for the upgrade are the Lowrance Yamaha adapter cable which plugs into the motor and outputs into a standard NMEA 2000 connection and a NMEA 2000 starter kit (these components came with my gauge). There are other nicer multi-function gauges out there but I think the LMF-400 will work for me. People have had issues with the LMF-400 washing out in direct sunlight but I run with the bimini up 95% of the time and my windshield overhangs my instruments by several inches so my instrument panel doesn't see much direct sun. Additionally, since it's in the tach location, I'm looking directly at it. I can see where off angle viewing could be an issue. The toughest part of the install was running the cables under the boat due to limited space and doing the work by myself. One interesting note is I found my motor had about 8 less hours than the meter on the tach showed. Apparently the key had been left on at some point. I took pics of the install below with the components labeled and provided a list of the NMEA 2000 engine data put out by Yamaha outboards. Thanks to tcpip95 for providing additional info on the NMEA 2000 network install. This is a fairly easy inexpensive install for Yamaha outboard owners who want a little more insight into how their engine is running.
Attachments
Last edited: