Installing a Yandina Combiner

bcpnick

Nick
Messages
1,165
Reaction score
763
Location
Colorado
I picked up a Yandina C100 combiner a couple months ago and I need to install it on my boat. I'm a little confused though, and I'm hoping someone here can help straighten me out. For some reason I feel totally competent rewiring my entire home in high and low voltage including keypads and speakers in every room, but battery wiring confuses me. I've been looking over the Yandina instructions here: http://www.yandina.com/acrobats/C100Data.pdf

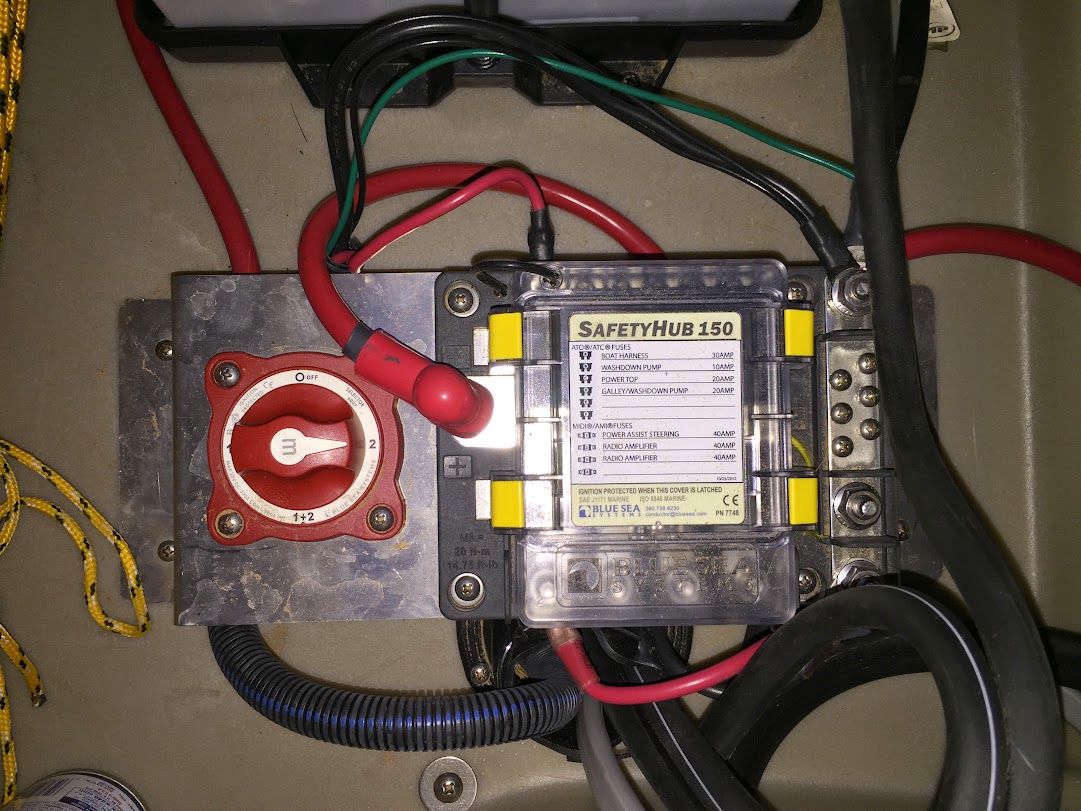
What I'm having trouble with is how that correlates to the 1+2 switch and the Safety Hub 150 I have. Do I need another switch in there somewhere to make this work? The wiring coming out of the Yandina is so simple that I think maybe I'm just overthinking this. Any help would be much appreciated. 

IMG_1940.JPG
 
I think you just connect the 2 power wires to common 1 and common 2, then the ground, and you're good to go.
 
Let us know how this works when you get it installed!!  I am interested....

I also need to find a way to charge the house batter (3rd battery) as that is only charged from the separate plug-in charger in the boat.  Pain in the ass when you don't know if the docks will have power or not....  It would be so much better if it would charge when on alternator.  Also not sure how that would react with the refrigerator that runs off it, etc....
 
So by common 1 and common 2, that's just 1 and 2 on the red battery switch. Right? This is from the instructions, and I think that's correct. So it sounds like if no matter if you leave it on 1, 2 or 1+2, it will charge both batteries, which is great. But does that switch need to be left on just 2 all the time to keep the stereo and stuff from depleting the starting battery? But with it on #2, it will still use #1 to start? Maybe I should call the Yandina folks tomorrow, but if anyone can clarify that, it's much appreciated. Where's PDX Hosedragger?

1. Single engine powerboats:

With the Combiner 100 you can use an OFF-1-BOTH-2

switch to select the engine power source and leave the DC

loads permanently on battery 2. Starting power is normally

supplied from the starting battery in position 1 but battery 2

or both can be selected in an emergency. In all cases, both

batteries are being charged when the engine is running.

WARNING: If you use this circuit, turning the switch to “OFF”

while the engine is running may damage your alternator.
 
The folks at Yandina are awesome. Sent them an email around midnight EST on a Sunday night and got an email back within 30 minutes. Below is what they said. It sounds like I have it right, but to keep the house from draining the start, I need to move those loads off of the common on the switch. 

Nick,
"If I understand correctly, all I need to do to install the C100 is connect the black wire to the common negative on that hub, then the two red wires to the red 1 and red 2 on that switch. Is that right?"  CORRECT.

YES, with switch on 1, BOTH or 2, both batteries will get charged.

Discharging load depends on how your switch is wired.  If the "Common" terminal of the switch runs everything (engine start and house loads), then the battery that gets discharged with house loads depends on where the switch is, 1, BOTH or 2.

Typically when using a Combiner, one battery (usually #1) will be dedicated to engine starting ONLY.  All the house loads are then removded from the "Common" terminal of the switch and connected to the other battery (#2) directly so they don't go through the switch.  Often a circuit breaker is used on this positive cable from battery 2 to allow a master on/off switch and provide safety - this may already be built in to your house loads distribution.  With this setup you leave the switch permanently on 1 and only put the switch on 2 or BOTH if you had a starting battery problem and needed help from the house battery to start the engine.
 
Last edited by a moderator:
Without going into a lot of details, I rewired mine from scratch because, at least on mine, the factory wiring didn't completely separate starting from house. I used the Blue Seas components and re-did all of it to be totally "clean" in that regard. Also, the Verado really needs to be completely isolated. See page 3 in the pdf attachment for how I did it.


Verado Batteries Rev 1.pdf
 

Attachments

  • Verado Batteries Rev 1.pdf
    28.6 KB · Views: 23
I just did this on my 21slx. I had it on our last pontoon as well. Loved it. nice to know no matter how long or loud you listen to the music, you will always have the juice to get home.

Brian
 
I have the safety hub 150 with the single battery switch.  Is it safe to assume when I upgrade to the dual battery setup with the combiner I only need to change out the switch itself and not the entire safety hub?
 
I didn't even have to remove the switch. I left it all as-is and just added the combiner. Super easy and it works like a charm. 
 
I have the safety hub 150 with the single battery switch.  Is it safe to assume when I upgrade to the dual battery setup with the combiner I only need to change out the switch itself and not the entire safety hub?
If you do it like mine you'd remove the switch, keep the hub. There are certainly many ways to do it, but that's what I chose.
 
Nick,

Do you have a picture of your final installation? I have the same set up as you and am not sure where to hook things up. Much thanks
 
Nick,

Do you have a picture of your final installation? I have the same set up as you and am not sure where to hook things up. Much thanks
I don't. It's stupid simple though. Like so simple that it made me think it couldn't be right. There isn't even really a picture to take. The combiner is just sitting in there wired in. I didn't even screw it down to anything yet. I just hooked up the black wire to the common ground on my block, then a red wire to each the 1 and 2 on my switch. I now leave it on 2. My #2 battery takes all the load but both stay charged and tip-top full. The blue and green don't get connected at all. Someday I might switch the other wiring so that my house batter and starter batter are divided, but for now, it does the job fine and I know I'll always have a nice full battery on backup if I need it. 
 
This is the diagram I have used 3 times now. Always worked for me.

gallery_6303_842_43113.jpg


Sorry, As I read this again, I now see your setup is more complicated. This may or may not help..

Brian
 
Last edited by a moderator:
Back
Top