For you DIY types, who works on or bleeds their own Seastar steering system?

FIRE UP

Well-Known Member
Messages
190
Reaction score
363
Hey Gang,
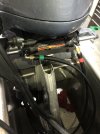
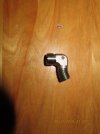
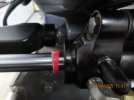
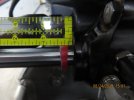
Been a bit since I've been here. I have a kind-a weird situation. We came home from a 5 week RV trip recently and in making my rounds of the house etc. I found that there was an oil puddle under the very rear of the center pontoon on the concrete. Obviously it's not the lower end of the prop etc. since it's farther forward. It was red-ish in color which auto-pointed to the steering system since I used ATF when I filled the system and bled it way back a while ago. Well, upon further inspection, I found what you see in the pic. It's a bent 90 degree fitting that one of the steering hoses connects to on the Seastar HC5345 cylinder.

At first, I thought what in the he.. could have actually bent that fitting, especially in the UPWARD angle. It's bent enough that it almost touches the bleeder right above it. The other 90 degree fitting on the other hose is perfectly fine. But, due to the stress of this bent fitting, it has caused a leak at the threads. Since it was at such an angle, I immediately thought the cylinder was damaged and I began searching for a new one. They're not cheap folks! I was looking at spending somewhere north of $800 for a new HC5345 cylinder with attachments.

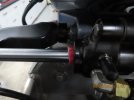
Well, I got around to removing that cylinder today and brought it in to the work bench. I had to remove the bleeder in order to gain clearance for the swing of that bent fitting while I unscrewed it. To my surprise, upon removal of that damaged fitting, it appeared/appears that the threads in the cylinder are not in any way damaged. I just happened to have a 1/4" short 2" brass pipe nipple hanging around in my junk plumbing box and screwed that nipped right into those threads without any form of interference or off camber attitude. Those threads are perfect.

Ok, that's the history. I've acquired a new fitting for the cylinder and will install it and the cylinder tomorrow and reattach the hoses and all the rest of the components. Then, due to the bend, which caused the threads to stretch on the bottom side, it had leaked for a while and the warm weather we're having here in Havasu which is about 200 degrees in the shade, and a few drips when the system was taken apart to work on that cylinder, I'm gonna have to bleed the system. I have done it before and with decent success. But, that was a while ago and I'm gonna have to do it again. I've watched a good half dozen videos and some are kind of conflicting with others. There are numerous "kits" for this operation on line, especially Amazon.

Many of those kits supply and employ a short clear line with quick release fittings that connect to the bleeders. But, where I'm a tad confused is, when people are using that line, and it's connected to the two bleeders, the bubbles are simply transfering from one side of the system to the other. And back and forth. I'm just not quite sure how that works. And this leads me to my topic or heading of this thread. How many of you that do this type of work, do your own steering system bleeding and may I ask what your methods are? I sure appreciate any help or advice here.
Scott
 

Attachments

  • IMG_8575.JPG
    IMG_8575.JPG
    128 KB · Views: 7
Wow, no one's worked on or bled their hydraulic steering systems?
Scott
 
Not sure if anyone has or not, but since this was only posted overnight, it may take some daytime hours for the right people to read this and respond. I agree that the Hull Truth might have more DIY people with this sort of specific experience as well. So might be good to cross post what you have above over there and see what you get.

I’d toss in some advice, but the extent of my DIY on my boat these days is opening my own beer. ;)

Good luck!
 
Last edited:
You can download the Seastar manual on how to do it. It's a PITA mess. I splurged years ago and bought the Power Purge when I had multiple boats with Hydraulic Steering. I'd be glad to do it for you for you it's a bit of a ride across I-10 to north Florida! You don't have to go to a Bennington dealer to get this done. Any local boat shop can get it done in 10 minutes and $100. Worth every penny.
 
Hey guys,
I surely appreciate the advice here. I sometimes get impatient. I did cruise over to The Hull Truth and poked around 'till I actually found exactly what I was looking for. And that was/is a thread on bleeding the system. The problem with that particular thread is, about 80-90% of it deals with "AP" or Auto Pilot and the bleeding of it too. Well, I'M the auto pilot on our boat so, I kind-a have to take all the answers and suggestions and funnel out anything that has to do with AP and then see what's left that I can use for advice.

All of the info is helpful. It's just that, if there's components that are options, like electrical power steering assist or AP, you have to work out what's good for you in terms of how things are done and when. Our boat happens to have electrical power assist steering which, is phenomenal if you've never tried it, you should. And I don't mind doing things like bleeding this system myself. I'm retired and have been for a while and I still enjoy working on or performing maintenance on my own stuff, to a limit. Bleeding a steering system is actually fairly easy. But there's some slight confusion as to the equipment and the exact way things are done.

There are some on good ole Youtube University that have created their own way of doing it and have had success. And some use the Seastar manual and some use both. I know one thing though, Seastar steering fluid is PHENOMENALLY COSTLY compared to any other brand and it's all the same stuff. I've been using basic ATF for a couple of years now and that system has worked absolutely flawlessly. And the cost per quart is about 1/3 to 1/4.
Scott
 
Never ever use ATF in a hydraulic steering system. It is to be used in an emergency only! There is a Phillips 66 equivalent that you can buy at your local municipal airport. It's dyed red so you can see a leak on an aircraft. It is an approved substitute for Seastar fluid. I don't have the number in front of me. But honestly, 2 bottles of Seastar fluid will run $40, so what?
 
Well,
Not to be argumentative but, as stated, my Seastar system with electronic power assist in our '14 Benny 25RCL with the Yamaha 5.3L V-8 350HP, has had ATF in it now for at least 3 years and there's been no catastrophic events or failures, no massive leaks, no drop in performance, and not even a hint of any form of an issue. While I don't have one at hand that I can link, I have red of situations or documents that stated that ATF CAN be used. I am no "oil" specialist or engineer but way back when I damaged one of my hoses a few years ago, I'd red of many boat owners that had switched to ATF as an alternative to the ultra high priced Seastar fluid and they too had absolutely zero issues after it had been in their systems for quite some time. So, I thought I'd try it. No issues in the 3+ years.

And as for your price of a couple of "bottles" of Seastar fluid for $40, well, you must live in in different part of the country or have some inside privy to seriously special prices of Seastar steering fluid.

I'm assuming that by "bottles", you mean quarts, correct? Especially since that's the most common way Seastar is sold. And a couple of quarts, using advanced math is jussssst a bit over $40...

and here:


and here:


and even at West Marine, different packaging but same product:


And any entity that manufactures products like Seastar and markets their own OIL, will of course say it's the ONE AND ONLY oil you should use. I get that. It's business. I have a Caterpillar C-7 330HP in our diesel pusher motorhome. CAT says you should ONLY use CAT oil and filters. Hmmm, I've been using aftermarket filters (WIX, Carquest, Napa and more) and various brands of oil (of the designated weight though. 15W-40) now for 121,000 miles and 21 years and well, that motor has not grenaded yet. It's a choice thing. You choose what's best for you.
Scott
 
Don't get fired up! The point was it's cheap, not worried about price to the third decimal place...Use the aftermarket stuff, I've been bleeding hydraulic steering systems for 30 years and never had a comeback, always used Seastar fluid. To each his own!
 
Well boys and girls,
It's all done. After watching a few dozen videos and reading the Seastar manual and instructions, it's all bled and I've got a new fitting on the cylinder where the damaged one was. While in reality it's not a hard or even overly technical, there is a method (or two or three) that can be followed. Yeah, yeah, I could have just towed the boat down to our local Benny fix-it place and had them do it for a mere $250 or more. Yep, they have a fairly high hourly rate here. But, I still like doing lots of this kind of stuff for myself. Only been doing my own work now for about 55+ years or so. Why quit now? Anyway, while the job is done and I got about 99.99999999999% of the bubbles out, I still have about a half inch of swing in that motor by moving it by hand. Not the end of the world but, I may try one of the wazoo YouTube methods to see if I can get it to zero engine movement.
Scott

P.S. One thing though, in following even the first part in the Seastar manual, there's things that don't make sense. What they have you do and the end results I encountered are not the same as what they show for results. From then on, their instructions just don't seem to add up. Oh well. it's basically done.
 
Scott,
1/2 inch steering lash is too much and will be noticeable. That's why we spend $1100 on a Power Purge, do it in 10 minutes, no air, no comebacks. I'm sympathetic trying to do it by the manual or Youtube. You cannot get all of the air out, I've spent hours trying. I'm 65, retired from 46 years in manufacturing with the same company, started as a toolmaker, so details come easy for me. Always made what I didn't want to buy on a lathe and a milling machine. My retirement allows me a bit of investment latitude now as I'm sure yours does as well. As I age, My emerging equation is; Investment / aggravation = lower blood pressure, less collateral damage when I'm getting ready to toss a wrench across the shop when my wife asks "honey, what are you doing and why don't you do it this way"? I made the mistake of showing the picture of your sponsons to my wife and she said, " how come our Bennington doesn't look like that one" I said, "because there would be one less person in this household and I'm too cheap to spend $2K to get it done and maintain it"! It's all about life's priorities!
 
Hey Fitz,
I certainly appreciate your input here. And I surely appreciate all your knowledge and experience in the mechanical field and world. Even though I was only a mere fireman for around 30 or so years, I did have a chance to play on a lathe once in a while due to my overtime job of outfitting new fire trucks. That was fun. As for a mill, I've always wanted to try my hand at one. But, I figured I'd get something all setup, turn the switch on and I'd destroy half a city block before I could find the off switch. So, that was that.

Anyway, my "eyeball" estimate of the amount of play in my system when done apparently was off by quite a bit. When I did that *push-shove* of the engine to check and see just how much side to side play I had AFTER I'd done the bleeding, I was looking at the prop nut. I just went out and did a way more advanced, highly accurate, severely scientific test again. For this space age test, I pushed that engine as far in one direction as it would go against the pressure of the hydraulic system which seemed to be actually very, very little. Then, as you can see in the pics, I cut a piece of Pex tubing and placed it on the cylinder shaft, right against the seal. I then pulled that engine as hard as I could (I'm 6' 2.5" and 245) and as you can see, I only moved that pex piece 1/8".

Of course, I'd love to have every single micro-bubble out of the system and have absolutely ZERO movement of that little Pex piece with the same type of testing procedure. That would be the ultimate. And yes, of course I'd love to use a Power purge machine to accomplish the removal of all micro bubbles. It's just a bit tough for me to comprehend paying over $250 (maybe more knowing our Benny dealer) just to remove 1/8" of play.

"Power bleeding" is not new to me. Long, long, looooong ago, I had a '67 Chevy Nova SS with Corvette brakes on it. For some odd reason, I'd loose strong and hard pedal in the brakes about every couple weeks. I'd tried and tried and tried to hand/manual bleed them only to end up with mediocre results. I'd watched one of our local brake shops "Pressure" bleed a car one time and that that was incredibly slick. Soooo, I decided to MAKE my own pressure bleeder for brakes.

I welded up a plate that I'd cut to fit on top of the master cylinder of my Nova after the lid had been removed. I'd brazed on an air fitting to that plate and glued a gasket to seal it to the master cylinder. I then used a C-clamp to clamp it to that master cylinder. I thought to myself, "huh, this ought to work like a champ". Well, I grabbed my air hose and fitted it to that fitting on that newly made adapter and the end result WAS NOT PRETTY!!!!

I instantly blew brake fluid all over me, the car, the shop, EVERYWHERE!!!! The reason was, I was using shop air pressure which was in the vicinity of 120-130 psi. Well, I found out that the air pressure those brake shops use is really only about 5-10 psi. I'd purchased a regulator and adjusted my shop air down to that psi and vuuuuuallllla, I had perfectly pressure bled brakes. And they actually lasted way longer than the previous method did.

Soooo, anyway, will I make my own Power Purge for bleeding my own steering, well, the thought has crossed my mind. But, nothing's on the drawing board just yet. Since you appear to have GREAT knowledge of these systems, if you would, I'd like you to take a look at this video, if you haven't seen it already and voice (write) your opinion. As you also know by doing the work and seeing videos etc for as long as you have, there appears to be at least a few methods of bleeding these systems. This persons method *seems* to make sense and if I had to guess, since I really don't know, it almost looks like a manual version of the power purge. Your thoughts please?


As for my polished pontoons, I surely appreciate any kind comments. I have dug myself the old proverbial "hole" here. I polish those to your basic MIRROR finish to where you can shave in it. Then, we take the boat out for a mere 5-6 hours on the lake. Then bring it back in and, there's a serious stain on those pontoons from the waterline down. They now have to be re-machine polished AGAIN. And that process, which I've narrowed down considerably, still takes me around 4-5 hours after EACH TIME we take the boat out. Needless to say, as much as we really love the look of them, and get tons and tons of nice comments on them, this process has gotten old a long, long time ago.
Scott
 

Attachments

  • IMG_8576.JPG
    IMG_8576.JPG
    70.1 KB · Views: 4
  • IMG_8577.JPG
    IMG_8577.JPG
    72.7 KB · Views: 4
  • IMG_8578.JPG
    IMG_8578.JPG
    75.1 KB · Views: 4
The video shows the typical way to do it. I've had some better luck with a second person pushing on the engine to its mechanical limit and holding it there while you turn the helm, then stop, the start again, I always would get a little burp of air doing it that way, in both directions and would do it several times.( I even do this with the (Power Purge) One tip I learned from experience was make sure you don't open the bleeder screws more than 1/2-5/8 turn out max. I have had air get sucked in through the threads if you open them too much. Did you ever figure out exactly how that fitting was damaged? I have seen a number of installs from Dealers that were sloppy work and dangerous, tiller bolts rubbing, fitting inference with jackplates, hydraulic hoses rubbing and chafing, you name it. When I saw your fitting I cringed, imagine it it broke off at 40 mph! You need to check what that fitting(s) are doing at every conceivable pivot and trim angle and make sure it touches nothing...
 
The video shows the typical way to do it. I've had some better luck with a second person pushing on the engine to its mechanical limit and holding it there while you turn the helm, then stop, the start again, I always would get a little burp of air doing it that way, in both directions and would do it several times.( I even do this with the (Power Purge) One tip I learned from experience was make sure you don't open the bleeder screws more than 1/2-5/8 turn out max. I have had air get sucked in through the threads if you open them too much. Did you ever figure out exactly how that fitting was damaged? I have seen a number of installs from Dealers that were sloppy work and dangerous, tiller bolts rubbing, fitting inference with jackplates, hydraulic hoses rubbing and chafing, you name it. When I saw your fitting I cringed, imagine it it broke off at 40 mph! You need to check what that fitting(s) are doing at every conceivable pivot and trim angle and make sure it touches nothing...
I surely thank you for the tips, very much appreciated. Now, as for the mystery on how that fitting got bent. Well, I looked and looked and for the life of me, in the onset, I could not figure how in the world, that fitting could have got bent in the manor which it was. Then, while sitting on the couch and looking at pics of the boat and motor and all that, it hit me. I wonder I thought to my self, and it immediately made sense, if the tilting of that motor could have jammed that fitting up against the BACKSIDE of the transom??

You see, in the typical photos and videos you see of that Seastar cylinder on the front of just about any engine, those 90 degree fittings are installed in such a manor that they are parallel with the cylinder. And also typically, they both face in one direction, to the port side of the boat. So, both hoses are installed so they're parallel with the cylinder and both loop around and in most cases, form a 180 degree bend before entering into the splash area ports to proceed forward.

But, in my case, the port side fitting, had been installed so that the threads for the hose, faced STRAIGHT DOWN, perpendicular to the cylinder. Now, a tad bit of history here. When we first procured the boat, that motor only tilted up to a point where the top of the engine came somewhat close to the ski-tow bar and that was it. Well, being new to the boat, I wanted full tilt on that motor so I could put a transport block in between the motor and transom mount. So, off to the Benny dealer. I asked if they could do anything about this situation. Yep, they could and it cost me a few bucks but, it was really simple. They just plugged in their little lap top and, re-programmed that motor to tilt the full amount. Yep, the top of that motor misses the underside of that ski-tow bar by about 3/16" or so, close! But it never touches.

So, I was happy. But, while I was jazzed about being able to tilt that engine and fabricate and install a transport block to support that engine during transport, I never, EVER looked at the steering hoses during full tilt. Not too long after that tilt adjustment by the dealer, I'd blown a steering hose back there. I figured it was really odd that I'd had a hose fail with only 25-30 hours on the boat. But, I wrote it off and just replaced both hoses. I now realize, it was highly possible that the adjustment to allow for full tilt, coupled with the one cylinder/hose fitting installed in the manor in which it was, with the threads DOWN, plus the hose fittings and strain relief, and the full arc of the tilt, caused a collision between the hose fittings/cylinder fitting and the backside of the transom.

Skip forward now about 5+ years and we have the situation that's being spoken about. If this was/is the cause of that seriously bent fitting, and it (the bending of that fitting) happened quite some time ago, then WHY did it take so long (again, around maybe 4-5 full years later) for that arc in the fitting threads to start leaking???? When I initially saw that bent fitting, I thought oh crap, now I have to buy a whole new Seastar cylinder because it looked like that fitting had simply caused the threads in the cylinder to TILT up towards the bleeder. And in fact, the outer elbow of that 90 degree fitting was only about 1/8" inch away from the bleeder!!!

So, when I removed the whole cylinder to get it to the bench to work on it, I finally got that bent fitting out and to my surprise, the threads in the cylinder are in no way, damaged at all. They are in fact, flawless. Welllll, that's great news because I now don't have to spend between $600 and $800 on a new Seastar HC5345 cylinder. But, obviously I had to procure a new 90 degree fitting and of course, no one in this small town is gonna have a specialized STAINLESS STEEL 90 degree NPT x 3/8 tube so, (and this is where you'll have my a...) I improvised and got a BRASS 45 degree fitting. Yes, yes, I know, EVERY fitting in that entire steering system is SS. And I have two new "ORB" SS 45 degree fittings in my cart on Amazon just ready for the "complete the purchase" button.

But for now, the damaged fitting has been replaced, the system has been bled to a point there's as shown and stated, there is right at 1/8" movement in that cylinder with forceful pushing and pulling. I will get those new fittings and install them shortly. Oh, by the way, I did install that new brass fitting in such a manor that instead of facing straight downward like the damaged stainless one did, It's facing out at a 45 degree angle and, I tilted that motor full tilt and even this new setup causes that new fitting and hose end, to come within 3/8" of an inch from contact with the backside of the transom.

Now, can I install that new ORB fitting so it's horizontal like the other side? Well, I'm not sure I have enough play in that particular hose to accommodate a 180 degree turn to where the hose emergers from the edge of the rear deck in the engine compartment. I'll re-analyze this soon.
Scott

P.s. While it's fairly difficult to see, the ONLY two images I have of the "before" and after the bend in the fitting (and dealer adjustment for full tilt allowance) are here. You have to zoom in fairly close to see in the first pic, that fitting is coming straight out of that cylinder---- NO BEND. Then, in the second pic, again you have to zoom way in and know what you're looking at) you can see the fitting is bent.
 

Attachments

  • IMG_1415.JPG
    IMG_1415.JPG
    118.2 KB · Views: 6
  • IMG_5351.JPG
    IMG_5351.JPG
    110.7 KB · Views: 6
That's the kind of stuff I'm talking about, the dealer did not check this before he gave it back to you. Enough said about that. Thank goodness nothing bad happened and you are now aware of it. The new QRB fittings will give infinite adjustment to the fittings to lay exactly where you need them.
 
That's the kind of stuff I'm talking about, the dealer did not check this before he gave it back to you. Enough said about that. Thank goodness nothing bad happened and you are now aware of it. The new QRB fittings will give infinite adjustment to the fittings to lay exactly where you need them.
:)
 
Back
Top