Install Transducer and cable

rcurran

New Member
Messages
1
Reaction score
1
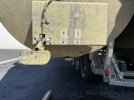
I am ready to Install a Garmin Striker Fishfinder and would like some advice. Tell me what you think. I plan to mount the transducer on the right starboard Poon behind the ladder on the factory bracket.
Where is a good place to look to run the transducer cable? Since i don't want to follow exisiting power cables (to avoid interference). Some installs seem to stay on the outside of the console. Display is attached to the rail.
Others use a cup holder to mount the display unit. In that case the cable would need a route into the space beneath the con sole. Ideas would be appreciated on what people have done.
 
2017 23RCW. I Replaced my old, original Garmin with a new larger screen which required a new transducer, so I made a blank to fill the old helm-hole (then put a hole in that and a “hood” to route the cable to the new Garmin. New Garmin is mounted on the right of the helm in an otherwise unused area so it doesn’t block anything.

The transducer is on the port toon, but the wiring is essentially the same I think. I’m not sure if it is easier from helm to stern or stern to helm - I did the latter and wasn’t about to do it a second time! Basically it is a lot of fishing of the transducer wire. Start by making sure you have enough length - if not, buy the extension, securly attach it and add a wrap or two of waterproof tape. This is mainly so you don’t pull it apart while fishing it through.

Above my toons at the stern there are some holes so I routed the cable through one of those and then it just lays on top of the toon to the helm. I was able to get a hangar in the space between the toon and the side pieces, so didn’t have to remove those. Just slowly fish the cable forward until it was under the helm. Inside the helm, on my boat there is a boot with a bunch of cables running through (helm to under the deck). I loosened the boot (I think it had a large zip tie, which I later replaced), then sent a wire down. I was able to fetch that wire and the transducer cable from the side of the boat and wrap them together, then pull up int the helm. Finally, secure everything under the helm and route to the Garmin along with its other wires (which also are connected under the helm).

It is a “fiddly” job but not hard; some points along the way it helps to have an assist.

I would rate this a basic vocabulary job, few extra words needed to complete.
 
My factory Garmin was also mounted on the port toon which is odd because you typically want them mounted to the starboard side due to prop wash from a std rotation outboard. Mine was routed along with the factory underwater light wiring and zip tied once it went under the wave shield etc.

Transducer cables are fully shielded with aluminum foil inside the jacketed cable, so it will reduce any interference you might see from other power cables. But I agree, its best practice to not run them together. if you do end up having "lines" of interference in your screen, you can always add a "snap ferrule" over the cable just before

mine was indash mounted and it was also ziptied to all the inside console wire harness bundle. So I think your chance of getting interference is pretty low to nil.
 
Yes to all the above. Don't worry about interference. The cabling follows the toon passing through the M brackets wherever you can pass it through. Zip tie in spots to minimize that cable flopping around and wearing on something sharp. Mine pops into the helm via the deck hole for the engine bus and steering cables.

If you have 30mins remove the skirt on the side above the toon and below the rub rail. It's a bunch of hex bolts and a bit of a pain getting your box wrench in there to keep the nut from spinning, but makes fishing your cable a breeze.

IMG_6539.jpeg
 
When I purchased mine, it was high on the mounting bracket and did not work well. I moved it down as far as I could - works great now. Picture is not my Benny, but the guide I followed.
 

Attachments

  • Transducer Location 1.jpeg
    Transducer Location 1.jpeg
    122.4 KB · Views: 5
Just like Poto said above, the removal of the facia, wainscoting, garnish or whatever you want to call it that provides a pleasing view transition from the toons to the deck edging. Yes, it's a bit of a pain to remove and replace simply due to the way it's attached. If I recall, at least on our boat, a 25RCL with the Yamaha 5.3L V8 350HP F350 engine, there's 21 3/8-16 x 1" SS bolts and corresponding SS nuts that retain that garnish. I've had to remove ours, on both sides for various reasons, at least three times.

When our factory Garmin decided to take a vacation and never come back after about 6-7 years of service, I purchased a new Garmin and I had to install a new transducer, cable and all. The removal of that garnish is the ONLY way to correctly route the wires and cables accurately and efficiently. My original transducer was (and still is) on the left or "port" toon end. This new one is on the right rear toon end. When I blew a power steering hose, again I had to remove that garnish to route the new hose(s) (sold in pairs) along the top of the right toon and then up under and into the console area. I have a trick to my method though. I use a couple of Vice Grip 11R welders clamps to hold that 22' piece of aluminum side wainscoting in place while I remove all 21 nuts and bolts. Then, when it comes time to actually remove it so I can proceed with my work, I have the CEO come out and she releases one of those clamps and I release the other one and we both now have that 22' long piece in our hands and set it down carefully. You can now see all wires, cables and other stuff that's routed under the floor from the front of the boat to the rear.
Scott
 

Attachments

  • IMG_1795.JPG
    IMG_1795.JPG
    167.5 KB · Views: 3
  • IMG_1809.JPG
    IMG_1809.JPG
    205.5 KB · Views: 3
Back
Top