New Stereo Time

MrG

Well-Known Member
Messages
667
Reaction score
497
Location
Lake Tulloch Ca
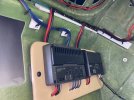
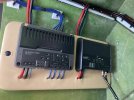
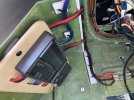
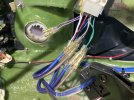
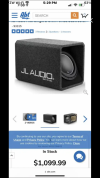
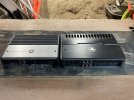
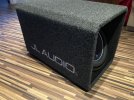
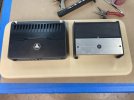
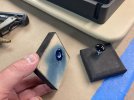
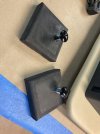
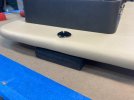
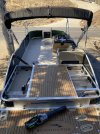
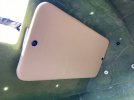
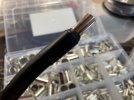
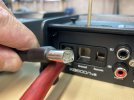
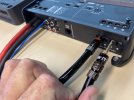
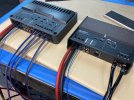
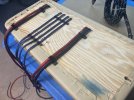
Well my high powered (100 watt) Sony head unit sorta crapped out. The 2 rear channels died. I have been able to resist the Upgrade stereo bug for 10+ years. I have run a Headunit & a 12inch 300watt self powered sub with a dash mounted remote and I have been pretty happy for 10 years. The stereo Runs all day & then some on a single group 31 battery. Super efficient but nothing to write home about. Well I found a deal on some JL equipment that I simply couldn’t pass up on. I got a JL 12w6 in a JL HO ported box and a JL 600/1 amp to power it. And I also got a JL audio 400/4 amp to power my 4 interior speakers. I had a Wetsounds WS-420 Bluetooth EQ sitting around doing nothing. The Bluetooth EQ is gonna take the place of my head unit. So I should be good to go. I will post some pics of the install as I go.
 

Attachments

  • 2AB87460-B12D-4D8D-B9AE-6C715279E988.png
    2AB87460-B12D-4D8D-B9AE-6C715279E988.png
    359.8 KB · Views: 30
  • F43F5036-5B00-47BE-BFD6-FB3F019BD961.jpeg
    F43F5036-5B00-47BE-BFD6-FB3F019BD961.jpeg
    196.6 KB · Views: 30
  • FF8FE6C5-42FE-40D8-9E4A-DEB4427ADFF0.jpeg
    FF8FE6C5-42FE-40D8-9E4A-DEB4427ADFF0.jpeg
    173.7 KB · Views: 29
Here is my Amp board
 

Attachments

  • E225F85C-6E29-4F06-8C41-C5BFA9C4B4B8.jpeg
    E225F85C-6E29-4F06-8C41-C5BFA9C4B4B8.jpeg
    117.4 KB · Views: 24
These are my Mount blocks. They have T nuts on the back side. I will glue these to the mounting location. These will serve as Stand offs and what the amp board mounts to
 
Here are the Mount blocks. These are what will be glued to the mount location. That make taking the amp board on and off if needed very easy. And for what ever reason if you make somthing New you simply use these same mount for a new amp board
 

Attachments

  • C1EF7F9E-789A-4481-9CB4-E7BB9A9CA64D.jpeg
    C1EF7F9E-789A-4481-9CB4-E7BB9A9CA64D.jpeg
    115 KB · Views: 25
  • 860BA6A5-1889-4A08-B2C9-ABD17586C369.jpeg
    860BA6A5-1889-4A08-B2C9-ABD17586C369.jpeg
    135.8 KB · Views: 25
They also stand the Amp board off the surface your mounting to so u can run wire under the amp board, comes out real clean
 

Attachments

  • 116FF52E-EA74-40F2-8032-BAC691D841E6.jpeg
    116FF52E-EA74-40F2-8032-BAC691D841E6.jpeg
    113.2 KB · Views: 25
That’s a great set up and mounting strategy MrG. I love it! Thanks for sharing with everyone.
 
No problem. The 2 types of Glue I have found to be good are. Bondo-Glass. It’s a thicked plastic filler with Fiberglass strands. It’s very common/easy to find and cheep. It’s a simple mix of Bondo Glass and Hardner and your hood to go.

And if your need to remove the mounts for what ever reason. A sharp putty knife from the side and a hammer will most of the time knock the mount right off.
 
The other glue I use is Liquid Nails (“heavy duty “ construction glue) . This glue is great as well takes longer to dry and works better on Uneven surfaces. It has a bit of give so if the surface your glueing to expands or contracts a bit it’s a better choice then then Bondo glass. I tend to use or like the Bondo glass cause you can set it and with in 30 Mins you can start hanging stuff on it. Heavy Duty can take 48+ hrs depending on the temps
 
Pre Wire all the amp’s
 

Attachments

  • E9350E74-927E-497C-9781-FAAE407B93DD.jpeg
    E9350E74-927E-497C-9781-FAAE407B93DD.jpeg
    82.2 KB · Views: 27
  • 5FB945B8-D46F-4F87-9DDB-974BC4EF1DE0.jpeg
    5FB945B8-D46F-4F87-9DDB-974BC4EF1DE0.jpeg
    116 KB · Views: 28
  • CF6D00F8-6792-42A0-AAB9-00376CDDF3E3.jpeg
    CF6D00F8-6792-42A0-AAB9-00376CDDF3E3.jpeg
    96.9 KB · Views: 28
Pre wire the amp board
 

Attachments

  • 9FBC6292-14A9-46F2-942F-C15216750C39.jpeg
    9FBC6292-14A9-46F2-942F-C15216750C39.jpeg
    82.2 KB · Views: 15
  • 65D38DF9-723E-44B9-A4C4-C67F7EE9A820.jpeg
    65D38DF9-723E-44B9-A4C4-C67F7EE9A820.jpeg
    116 KB · Views: 16
  • 19908D20-04BC-4F1D-9921-29BBEEE84A30.jpeg
    19908D20-04BC-4F1D-9921-29BBEEE84A30.jpeg
    174 KB · Views: 16
  • 638AAC8E-15E5-4D7C-8141-56BEEA7D6E39.jpeg
    638AAC8E-15E5-4D7C-8141-56BEEA7D6E39.jpeg
    96.9 KB · Views: 15
Here is the wire Management on the back side of the Amp board. This is where the mounting stand off come in handy
 

Attachments

  • C1F85781-5DA0-4EC2-A504-B55A64DA11CF.jpeg
    C1F85781-5DA0-4EC2-A504-B55A64DA11CF.jpeg
    151 KB · Views: 19
These plastic strips are gonna get glued in under the helm. They serve as mounting points for the Power Ground and Remote wires. These plastic strips make it easy to run a screw with a zip tie into for wire management. I drill & sand the back side of the plastic so the glue has something to bight into
 

Attachments

  • 6775DA4C-B5EE-48B3-BF5E-6E767DB111AB.jpeg
    6775DA4C-B5EE-48B3-BF5E-6E767DB111AB.jpeg
    99 KB · Views: 15
  • AB460A04-9B67-4B55-B54D-EA0ACD266D25.jpeg
    AB460A04-9B67-4B55-B54D-EA0ACD266D25.jpeg
    117.9 KB · Views: 15
This MB Quart Bluetooth Remote caught my Eye. Looks like I could remove the Dash Mounted Sony remote I have in my dash right now & mount this in its place.

I want my system to have “No head unit”this MB quart BT unit could send audio straight to the amps. It’s got its own sub control. So I might even be able to not use a EQ. My only thought is Most EQ’s boost Line voltage. This little unit may not have enough line voltage. If not then I’ll just run a EQ between the BT unit and the Amps
 

Attachments

  • C45276C5-6C03-4FE4-9CB4-F69D54A0F7EE.png
    C45276C5-6C03-4FE4-9CB4-F69D54A0F7EE.png
    335.3 KB · Views: 4
  • 6084058A-84B1-44B6-8388-3DE37C8EEF79.png
    6084058A-84B1-44B6-8388-3DE37C8EEF79.png
    312.3 KB · Views: 5
This MB Quart Bluetooth Remote caught my Eye. Looks like I could remove the Dash Mounted Sony remote I have in my dash right now & mount this in its place.

I want my system to have “No head unit”this MB quart BT unit could send audio straight to the amps. It’s got its own sub control. So I might even be able to not use a EQ. My only thought is Most EQ’s boost Line voltage. This little unit may not have enough line voltage. If not then I’ll just run a EQ between the BT unit and the Amps
I'm guessing this isn't your first stereo install. Very impressive work.
 
Hey if you guys have not tried these crimping tools I encourage you to do so. It comes with four different sets of jaws so you can crimp pretty much anything that you would ever need to crimp and these male and female crimps are awesome.
 

Attachments

  • EA4A1914-B3BC-4254-AD0C-5557F26A3237.jpeg
    EA4A1914-B3BC-4254-AD0C-5557F26A3237.jpeg
    154.9 KB · Views: 30
  • 8A090723-AEC4-4AE9-8CC0-6624ADB6BB88.jpeg
    8A090723-AEC4-4AE9-8CC0-6624ADB6BB88.jpeg
    138.5 KB · Views: 30
Back
Top