LaurencetheAdventurer
Well-Known Member
So I completed my first prop swap this weekend. Matching prop - will send damaged one for repairs and then have a spare.
There were a few details about this DIY that I have never seen mentioned - so sharing. I should preface that since my Benny is 5 hours away where the typical temperature is 100 plus degrees and my Benny is stored in the lake full time in the summer - figured best to just find a nice calm beach to do the work given how "EASY" it is. I downloaded and read a few installation sheets, including one that came with the new Enertia and ones found on various Mercury sites. I should have spent time on YoutTube! and will follow up with that, but for us Newbies:
1) Have a full set of proper instructions for the prop and correct hub (multiple washers in specific order).
2) You need two types of grease. This was only noted on 1 of the several sets of instructions that I had.
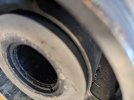
3) You might not be able to get the old hub out, good thing I had a spare. I also noted the coved washer was not flat - probably best to keep a spare or two.
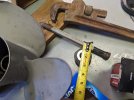
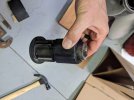
4) Tools: Socket, rubber mallet, dowel or other rod to knock out the old hub, some 2x4's to raise the prop up to knock out the hub, 2x4 or clip to secure prop and torque wrench (though I have read many skip this, especially those with a bit of experience with torqueing down nuts - not much force needed to loosen nut).
4.1) Holding the Prop - most suggest a 2x4, I had a fancy $5 clip - but it took me a good 15 minutes to figure out it went on the Ventilation Plate, not the prop - LOL.
5) I do suggest having a spare hub along with the spare prop. I also suggesting ordering extra coved washers (they re-tension the nut).
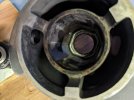
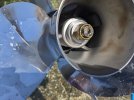
Now the interesting part was that the replacement hub (OEM) did not fit the same. It sat about a 1/16th of an inch higher than the original - the end of the hub where the nut is attached was 1/16 (est) lower from the lip (original at 1/32 (est) below prop lip) and the top (engine side) sat an extra 1/16th higher off the prop lip (original was a 1/32 gap between hub and prop seat). Of course I really whacked that hub a few times - it was not going any further. I stopped about a dozen times to check for slip / wobbles - none - so enjoyed the rest of the weekend not worrying about it. Of course for a newbie - this was a big disconcerting. I have yet to remove the old hub to further compare.
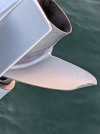
After I re-installed the new prop/hub - the rear of the prop was still inset / covered by the lower housing, Once I do get the original hub out, I will compare it with the additional spare HUB I have to see if there are any size variances noted and report back (the first one I ordered was backordered, so did a second next day delivery from another company resulting in two).
Bottom line - it was any easy project, but be sure to have the right set of tools, grease, wood blocks, punch rod, and be aware the hub might not fit exactly and probably best to find a few YouTube videos!!!
A prior comment noted my SS Enertia was an unusual color. I noted that after just one in the water the bright SS Prop turned a dull aluminum color - is this not typical?
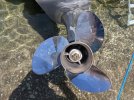
And, I noted the new prop did not really improve the performance vs the damaged prop - that was very interesting - though I suspect the prop imbalance of the damaged prop would have eventually lead to some issues.
After all - we do want to maximize lake time!!!!!
There were a few details about this DIY that I have never seen mentioned - so sharing. I should preface that since my Benny is 5 hours away where the typical temperature is 100 plus degrees and my Benny is stored in the lake full time in the summer - figured best to just find a nice calm beach to do the work given how "EASY" it is. I downloaded and read a few installation sheets, including one that came with the new Enertia and ones found on various Mercury sites. I should have spent time on YoutTube! and will follow up with that, but for us Newbies:
1) Have a full set of proper instructions for the prop and correct hub (multiple washers in specific order).
2) You need two types of grease. This was only noted on 1 of the several sets of instructions that I had.
3) You might not be able to get the old hub out, good thing I had a spare. I also noted the coved washer was not flat - probably best to keep a spare or two.
4) Tools: Socket, rubber mallet, dowel or other rod to knock out the old hub, some 2x4's to raise the prop up to knock out the hub, 2x4 or clip to secure prop and torque wrench (though I have read many skip this, especially those with a bit of experience with torqueing down nuts - not much force needed to loosen nut).
4.1) Holding the Prop - most suggest a 2x4, I had a fancy $5 clip - but it took me a good 15 minutes to figure out it went on the Ventilation Plate, not the prop - LOL.
5) I do suggest having a spare hub along with the spare prop. I also suggesting ordering extra coved washers (they re-tension the nut).
Now the interesting part was that the replacement hub (OEM) did not fit the same. It sat about a 1/16th of an inch higher than the original - the end of the hub where the nut is attached was 1/16 (est) lower from the lip (original at 1/32 (est) below prop lip) and the top (engine side) sat an extra 1/16th higher off the prop lip (original was a 1/32 gap between hub and prop seat). Of course I really whacked that hub a few times - it was not going any further. I stopped about a dozen times to check for slip / wobbles - none - so enjoyed the rest of the weekend not worrying about it. Of course for a newbie - this was a big disconcerting. I have yet to remove the old hub to further compare.
After I re-installed the new prop/hub - the rear of the prop was still inset / covered by the lower housing, Once I do get the original hub out, I will compare it with the additional spare HUB I have to see if there are any size variances noted and report back (the first one I ordered was backordered, so did a second next day delivery from another company resulting in two).
Bottom line - it was any easy project, but be sure to have the right set of tools, grease, wood blocks, punch rod, and be aware the hub might not fit exactly and probably best to find a few YouTube videos!!!
A prior comment noted my SS Enertia was an unusual color. I noted that after just one in the water the bright SS Prop turned a dull aluminum color - is this not typical?
And, I noted the new prop did not really improve the performance vs the damaged prop - that was very interesting - though I suspect the prop imbalance of the damaged prop would have eventually lead to some issues.
After all - we do want to maximize lake time!!!!!
Attachments
-
 2022-06-20 New Prop after 1 Day.jpg55.3 KB · Views: 28
 -
 PXL_20220610_192New Prop prior to install.jpg93.4 KB · Views: 27
 -
 PXL_20220606_022217076 Prop Damage.jpg82.4 KB · Views: 26
 -
 2022-06-19 14.04.02.jpg176.3 KB · Views: 25
 -
 2022-06-19 14.04.05.jpg114.9 KB · Views: 25
 -
 2022-06-19 14.04.09.jpg95.8 KB · Views: 25
Last edited: