Seat pedestals (any Advice)

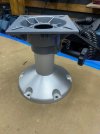
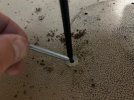
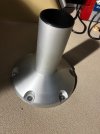
When I removed the Side Skirt you can get to the Machine Bolt's that go threw the Base plate & floor, They threw bolt with Nylocks Nuts on the underside. So ya need someone topside to unscrew from up top while you have a wrench on the nuts on the underside. I can see how all the Back & forth from normal use from up top has made the wood floor Not Ideal. Seems kinda comprised. What would be real nice is to Have a Nice base plate for the underside that the machine bolts could screw into ya know Threaded sections. This way it would be supported from the top and the Bottom. I bought a NEW Springfield Marine Seat Base and Pedestal its the 2-7/8th Variety. The Stock Pedestal height was 9inch tall So that's What I ordered. $140 from Amazon. Might try Send cut Send for a custom Underside Plate, And I had my brother 3D print a New plastic insert for the Pedestal after, The new insert and the freshly cut Pedestal Didn't seem to make Much Diff I think lots of the wobble is between the Old Base on the floor & Pedestal its just "Tore up from the floor Up" Looking forward to spring when This project most likely will be complete
 
Last edited:
Well,
Not seeing this situation up close and personal, I can agree with you on a "base plate" below the deck as a strengthener for the underside flooring. If it were me, and we were in that situation, I would do the same but, I'd make that underside base plate considerably larger in diameter and, I'd also make it out of probably 3/8" aluminum (preferably 6061 T-6 because that's considerably stronger and stiffer than your basic bubble gum aluminum 5052 or even 3003. No need for stainless steel in this situation, too heavy, harder to work with and waaaaaay more expensive when some 3/8" aluminum work for this project flawlessly. Heck, I might even almost match that new underside base plate with a larger one UNDER the pedestal but on top of the flooring. You'll get SERIOUSLY stiffer support by doing something like this and it will "sandwich" the flooring/decking and spread the lateral load out in all directions. If you think you might not like the looks of a large additional base plate under the pedestal but on top of the flooring, then just cover it with the same flooring. Good luck on your project and thanks for getting back here with your findings and potential plan(s).
Scott
 
I think that reducing plywood floor deflection will not create a perceivable amount of seat movement. You got sidetracked while trying to deal with one person seat replacement issues. Early on you identified the major source of the seat rocking back and forth. It is the plastic bushing that is loose and beat up from ignoring the friction adjustment screw. This screw seems to loosen up quickly and before you know it… Focus your creativity on that and we all could benefit.
 
As I stated earlier, not seeing the situation in person, it's tough to tell whether or not reinforcement of the deck below the seat base will be of real value. We can only go by what the OP is stating as problems or problem areas. Certainly, reinforcement would not hurt anything. We have a '14 2550 RCL Benney with the 350HP Yamaha 5.3L V-8 and to date, it's hovering around maybe 60-70 hrs tops and, to the best of my recall, we have very little seat play in any of the components but, it's been a bit since we've been out in it and will maybe take it out next week and I'll check.

But if I were to have the plastic liner issues the OP may be having, I'd definitely look into UHMW tubing as a high potential for replacement. I don't know how close some of that product listed below would or could come in a proper fit but I'd sure look into it. UHMW is Ulta High Molecular Weight and seriously high density industrial plastic. We used miles of it in outfitting new fire trucks for tools and equipment. You can beat on that stuff all day, all month and you won't even dent it. And it has a seriously low coefficient of friction so, it would be PERFECT for the application in this scenario.
Scott

 
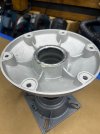
Will my new Springfield seat pedestal arrive today 2-7/8 one of the Major differences I see right off the bat is the Pedestal is welded to the base at the bottom.
 

Attachments

  • IMG_7603.jpeg
    IMG_7603.jpeg
    245.4 KB · Views: 8
  • IMG_7604.jpeg
    IMG_7604.jpeg
    191.1 KB · Views: 8
When I took the side skirt off a few months back to run wires for my Starlink. I was able to get a good look at the stock seat pedestal. It’s just Threw bolted from the top down with small washers & Ny Lock nuts. I’m sure larger thicker fender washer style washers will do the trick. Seeing /feeling my old pedestal and how much slop is in it compared to the new one in hand I’m sure all the back and forth with be gone or most of it.
 
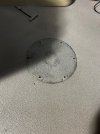
Well I finally got the Chance to have help. This is a 2 person job for sure. Step 1 take the side skirt off. Now you have access to the nylock nuts on the bottom side. The factory Bolts were way undersized. They looked like 1/4-20. And the washers were thin and not even Fender washers. So the washers were all crowned. They had been tightened so much that they all looked like Mini Volcanos. With some one in side holding the _#3 Philips I was able to take the lock nuts off. All But the Dreaded most forward Nut. You could absolutely NOT get to it. The side pontoon support was in the way and it was on the other side of a Crossbeam. Only option was to cut the last stainless bolt of. Lucky for me I had enough slop under the base to fit a hack saw blade.
But how was I gonna get a new nut bolt back. Well the hardwear store had these cool toggle bolts. I was able to drill a 1/2 inc hole in the problem child hole and slide this threaded insert into the hole and then this zip tie held this plastic retainer that held the toggle bolt in place on the underside of the deck. Once in place you cut the black zip tie and your left with a threaded insert. I went with larger 5/16 stainless bolts and thick stainless fender washers. Once I got them all installed and the seat back on it is 100 times better the seat hardly rocks now. Super happy.
 

Attachments

  • IMG_7740.jpeg
    IMG_7740.jpeg
    457.7 KB · Views: 7
  • IMG_7741.jpeg
    IMG_7741.jpeg
    270.6 KB · Views: 7
  • IMG_7742.jpeg
    IMG_7742.jpeg
    300.2 KB · Views: 7
Looks like new! Strange that original install had small washers, but maybe that was the design (tighten into a cone shape) although doesn’t seem logical.
Nice job and thanks for sharing so that others can learn.
 
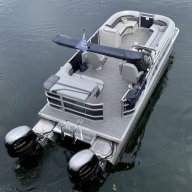
The Factory Must have installed the seat pylon when the under side of the boat was not installed yett. And if the factory would have just installed the seat pylon more AFT by like 4-5 inches all of this would never had to be done. I guess Bennington figured it was better to make the seat to close to the wheel then further away.
 
Sounds like the bolt and nut worked fine - but if no fender washer or of insufficient quality (or both) then it makes sense that the force on the nut pulled the washer into the drilled hole and turned them into cones. If you look at my picture it was a 2020 build and had what appears to the untrained eye sufficient design. Nothing is deformed in 6 years of hard use.
 
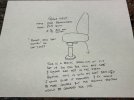
I think that the because the Washers were thin and the bolts stretched/ gave way. That the base had some back and forth to suck the washers into the wood creating even more slop. I’m sure it was because my pedestal was in my opinion mounted to forward making me have the seat all the way back putting way to much too leverage on the pedestal right from the get go. I did a crude drawing of my pedestal. I’ll share it with you. This is the one that I sent to Springfield, and they said the only corrective action was to relocate the pedestal. Long story longer. If the pedestal was in the optimal position, this whole thing would’ve never come to head. I will say that the new Springfield pedestal is much more stout.
 

Attachments

  • IMG_4345.jpeg
    IMG_4345.jpeg
    205.6 KB · Views: 6
Back
Top