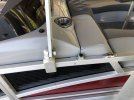
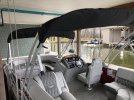
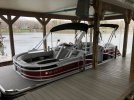
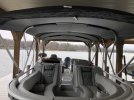
Installed a front SureShade Power Pontoon Bimini Top on my 2021 22RTFB (https://store.lci1.com/sureshade-power-bimini-power-bimini.html), with rear factory powered bimini already installed. Mounted the bimini facing forward. Some pictures on the web have it mounted backwards that has the bimini in the arch position slanting to the bow of the boat. I think mounting in normally with the arch slanting aft, like the rear bimini (see pictures) looks better. Also installed the 36" support arms to support the bimini when in the arch position (https://store.lci1.com/sureshade-sport-arms-for-power-bimini-36in-silver-2020134627.html). Install fairly easy. Routing the wires through the railing and into the helm was the most time consuming. Spliced the positive and negative leads into the same wire that powers the rear bimini. The kit comes with a remote and a wireless controller which mounts under the helm. The controller also has a small toggle switch that controls the Bimini should the remote fail. Next projects will be to add front straps for higher speeds (20 mph max speed without front straps), and to replace one of the spare switches on the helm with a 3 position switch to control the bimini. Very pleased with the results.
Navigation
Install the app
How to install the app on iOS
Follow along with the video below to see how to install our site as a web app on your home screen.
Note: This feature may not be available in some browsers.
More options
You are using an out of date browser. It may not display this or other websites correctly.
You should upgrade or use an alternative browser.
You should upgrade or use an alternative browser.
Front Powered Bimini on 22RTFB
- Thread starter jackpita
- Start date


Vikingstaff
Moderator
That looks great Jack! I was skeptical when I saw it all the way down across helm in the first picture. However, once up in at least the radar position, it looks nice. I like your thinking now that I see all the pictures with reversing the mount in that way.
Thanks for sharing with everyone. I really like it. Like you, I have the factory rear electric bimini, so this is a pretty neat idea for someone like me.
If you don’t mind, I have a couple curiosity questions:
(1) So you wired it into the same power lines as the factory electric bimini. Is that correct?
(2) As a result, do they operate in unison, or do they go up and down separately?
(3) My factory electric bimini trips its circuit breaker if I hold the toggle switech more than about 10 seconds. I have to let go and re-press the toggle switch a few times to deploy or retract my electric bimini. IF wired into the same power line, do you run into this issue as well with either the original electric bimini or the new front one?
(4) Finally, did you have to add a zipper to the front of your existing rear power bimini to connect them when deployed? It looks like they are connected in the pictures.
Timdelta
Well-Known Member
- Messages
- 460
- Reaction score
- 596
2 Questions - Where did u get the Naval Aviator wings? Navy or Marine?
Happy to answer:
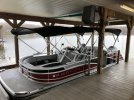
First picture, I put the front bimini all the way down so I can cover the boat with my after market cover. Otherwise, it is in the radar arch position, or all the way up.
(1) So you wired it into the same power lines as the factory electric bimini. Is that correct?
(2) As a result, do they operate in unison, or do they go up and down separately?
- Wired to the same power as the factory, but they do not operate together. Spliced in before the factory switch.
(3) My factory electric bimini trips its circuit breaker if I hold the toggle switech more than about 10 seconds. I have to let go and re-press the toggle switch a few times to deploy or retract my electric bimini. IF wired into the same power line, do you run into this issue as well with either the original electric bimini or the new front one?
- Mine does not do that. Not sure why your's does. Both operate normally, but I do not run them at the same time.
(4) Finally, did you have to add a zipper to the front of your existing rear power bimini to connect them when deployed? It looks like they are connected in the pictures.
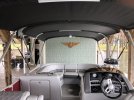
- Did not add zipper. There is a small gap between the two Bimini's. No problem while underway.
First picture, I put the front bimini all the way down so I can cover the boat with my after market cover. Otherwise, it is in the radar arch position, or all the way up.
(1) So you wired it into the same power lines as the factory electric bimini. Is that correct?
(2) As a result, do they operate in unison, or do they go up and down separately?
- Wired to the same power as the factory, but they do not operate together. Spliced in before the factory switch.
(3) My factory electric bimini trips its circuit breaker if I hold the toggle switech more than about 10 seconds. I have to let go and re-press the toggle switch a few times to deploy or retract my electric bimini. IF wired into the same power line, do you run into this issue as well with either the original electric bimini or the new front one?
- Mine does not do that. Not sure why your's does. Both operate normally, but I do not run them at the same time.
(4) Finally, did you have to add a zipper to the front of your existing rear power bimini to connect them when deployed? It looks like they are connected in the pictures.
- Did not add zipper. There is a small gap between the two Bimini's. No problem while underway.
Navy and Marine wings the same. I'm a second generation Naval Aviator. Those are my father's wings that he bought in the Philippines when he was a junior officer. WWII, Korea, Vietnam and the Cold War. I think they look great on the dock. I miss him everyday....
Timdelta
Well-Known Member
- Messages
- 460
- Reaction score
- 596
Sorry for your loss, I’m in same situation, dad is a Marine. I meant though are you a Marine or Navy? I am a retired Marine Pilot. Those wings look great on dock! Bimini work is quality too.
Vikingstaff
Moderator
Thanks for answering the questions. I think on the older electric bimini’s my issue is more common. Perhaps they finally improved the wiring in them in the newer models like yours.
Timdelta
Well-Known Member
- Messages
- 460
- Reaction score
- 596
I was east coast, a little bit helo, a healthy dose of C130 and a bunch of Gulfstream III and IV. Semperfi.
SEMPERFI8387
Moderator
Swing with the Wing!!!what did you fly? half my career with marines. Training Command, VFA-125, VFA-106, TR with VMFA312 as a sister squadron. we might have pulled G's together!
DVW
Well-Known Member
- Messages
- 243
- Reaction score
- 461
Great job making your boat your own. Bennington made the double power Bimini available this year but you probably have the first one. They choose to mount the front Bimini so it folds forward in the stowed position. You choose to mount the front Bimini with the same fold back orientation as the back Bimini. With your choice when both tops are in the arch position they both have the fast wind swept look. I agree with you I think that looks better.
Bill N
Well-Known Member
- Messages
- 1,824
- Reaction score
- 2,280
I have inquired about this before and it appears that is by design. Much better to trip breaker than pinch body parts.(3) My factory electric bimini trips its circuit breaker if I hold the toggle switech more than about 10 seconds.
Vikingstaff
Moderator
This is the first time I have heard this explanation, but it does make a lot of sense.I have inquired about this before and it appears that is by design. Much better to trip breaker than pinch body parts.
Finished project. Added front Bimini straps (https://www.amazon.com/dp/B0124LCDMU?psc=1&ref=ppx_yo2_dt_b_product_details), and replaced a blank dash switch, with the following switch (https://www.amazon.com/dp/B07XYC9DXZ?psc=1&ref=ppx_yo2_dt_b_product_details). Used the following tool (https://www.amazon.com/dp/B01CFHPXUM?psc=1&ref=ppx_yo2_dt_b_product_details) to take off the cover of the factory switch. Replaced the factory cover on the new switch. The new switch must be held in either the up or down position for the cover to move. Very pleased with the overall result.
SEMPERFI8387
Moderator
Can you explain in a little better detail how you ran the wiring, especially for the port side power actuator?
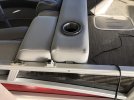
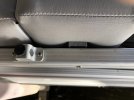
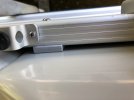
Wasn't easy. The upper railing has two channels, with a wall separating the two. Used a hole for the bimini mount to run a thin wire through the inner section of the railing back to the middle of the boat as a snake. Did this for both sides. Drilled through the backside of the helm's in the middle of the boat into the upper railing. Was able to hook the thin wire from this backside hole. Two people would have helped, but did this solo. Running the wire from the port side to the starboard / drivers side very straightforward. .
SEMPERFI8387
Moderator
Oh, so the port actuator has the wiring running through bimini frame to starboard side? If so, that now makes sense, easily getting power to that side.
Removed the bolt holding plastic spacer in the pictures. Drilled from backside of both port and starboard helm stations, into the inboard side of the railing. Put spacer back in and drilled a small marking hole in the spacer. Removed the spacer, enlarged the hole in the spacer for the wire to run through. Ran a thin wire as a snake forward from the newly drilled holes in the railing. Pulled the motor wire back through their respective holes. Recommend a second person to assist with snaking the wires. Did it myself, but two people would have cut the install time in half.