Navigation
Install the app
How to install the app on iOS
Follow along with the video below to see how to install our site as a web app on your home screen.
Note: This feature may not be available in some browsers.
More options
You are using an out of date browser. It may not display this or other websites correctly.
You should upgrade or use an alternative browser.
You should upgrade or use an alternative browser.
Live well
- Thread starter Sedona
- Start date
Maynard G. Krebs
Well-Known Member
- Messages
- 307
- Reaction score
- 316
That's a confusing post. Does your live well have an electrical problem or a plumbing problem?
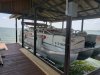
Plumbing problem....the old owner cut the hose near where the pump used to be..either replaced the pump with another one, or the intake hose would no longer fill the live wells..the old owner ran 3/4 inch plastic hose from the pump to each live well but ran that plastic hose along the outside of the boat...looks very bad. (It does work, and keeps live wells full, and once you are done with it, you can pull the plug and release the water...so I need to rerun the correct hose thru the pontoon? To make it look factory again. Look at pics and see plastic tubing....thanks for your reply and hopefully you can assist me
Attachments
Maynard G. Krebs
Well-Known Member
- Messages
- 307
- Reaction score
- 316
The hose routing is very basic, I don't know why the previous owner didn't duplicate it. Only possibility is that the boat is under skinned and they didn't want to mess with it, but being pretty much the same model as mine, I'm guessing it is just plywood on the underside.
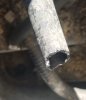
The factory used what appears to be a spiral wound hose, initially I thought it was rubber but on closer inspection it looks to be flexible plastic with a vinyl coating. They ran it from the pump up to the top of the port log.

They went a few feet forward and used a T fitting to feed the rear live well, and then continued along the port log until even with the helm before crossing over to the starboard side. From there, they went up through the floor into the helm area and attached to the fill valve.


I can't get pictures of the rear setup because mine is skinned below deck and the motor pod is in the way, but I'm certain its the same as the front. For access to the guts of the rear live well I would first try removing the top of it. It only has six screws holding it on. If that doesn't get you there my second choice would be removing the vertical panel above the fuel tank. That'll get you there but working around the fuel cell might be an issue.

Draining should also be the same, with an overflow tube that's unscrewed to let water out.
Concerning the wire, I have a different motor but I'm guessing it's the same thing as this one on mine.

I asked a friend that knows a bit about outboards and he said it's basically a ground conductor. From that I surmised it works in conjunction with the anode, but if anyone knows better feel free to correct me on that.
The factory used what appears to be a spiral wound hose, initially I thought it was rubber but on closer inspection it looks to be flexible plastic with a vinyl coating. They ran it from the pump up to the top of the port log.
They went a few feet forward and used a T fitting to feed the rear live well, and then continued along the port log until even with the helm before crossing over to the starboard side. From there, they went up through the floor into the helm area and attached to the fill valve.
I can't get pictures of the rear setup because mine is skinned below deck and the motor pod is in the way, but I'm certain its the same as the front. For access to the guts of the rear live well I would first try removing the top of it. It only has six screws holding it on. If that doesn't get you there my second choice would be removing the vertical panel above the fuel tank. That'll get you there but working around the fuel cell might be an issue.
Draining should also be the same, with an overflow tube that's unscrewed to let water out.
Concerning the wire, I have a different motor but I'm guessing it's the same thing as this one on mine.
I asked a friend that knows a bit about outboards and he said it's basically a ground conductor. From that I surmised it works in conjunction with the anode, but if anyone knows better feel free to correct me on that.
Omg...Sir, you have been more than helpful. That was very nice of you to take the time to give me help on these issues. I will take out the back live well for starters....The hose routing is very basic, I don't know why the previous owner didn't duplicate it. Only possibility is that the boat is under skinned and they didn't want to mess with it, but being pretty much the same model as mine, I'm guessing it is just plywood on the underside.
The factory used what appears to be a spiral wound hose, initially I thought it was rubber but on closer inspection it looks to be flexible plastic with a vinyl coating. They ran it from the pump up to the top of the port log.
They went a few feet forward and used a T fitting to feed the rear live well, and then continued along the port log until even with the helm before crossing over to the starboard side. From there, they went up through the floor into the helm area and attached to the fill valve.
I can't get pictures of the rear setup because mine is skinned below deck and the motor pod is in the way, but I'm certain its the same as the front. For access to the guts of the rear live well I would first try removing the top of it. It only has six screws holding it on. If that doesn't get you there my second choice would be removing the vertical panel above the fuel tank. That'll get you there but working around the fuel cell might be an issue.
Draining should also be the same, with an overflow tube that's unscrewed to let water out.
Concerning the wire, I have a different motor but I'm guessing it's the same thing as this one on mine.
I asked a friend that knows a bit about outboards and he said it's basically a ground conductor. From that I surmised it works in conjunction with the anode, but if anyone knows better feel free to correct me on that.
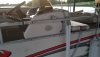
Now that I've got you, I'm in need of a few more items, bimini top...the original bimini frame seems out dated. There must be a new kind that fits the boat railings? Also the old owner, ( he was aboutb80 years old) did everything easy for him..he cutba larger hole in the center of the dash board and installed his fish finder, not the greatest idea or looks, but again for him functional. So I'm looking to make new purchases, like the dash , bimini top and frame, oh and some railing...when he would lift the boat, the cable lift would run on the frame and really caused damage..if it's any easier I can be reached at gmail [email protected]. you dont know how much I appreciate your assistance and advice...I love my very used but in good condition bennington..with some new parts and TLC I can bring her back to looking good..next project is shining the pontoons. Thanks again
Attachments
Maynard G. Krebs
Well-Known Member
- Messages
- 307
- Reaction score
- 316
Well, at this point I can only provide opinions rather than solid leads. From what I can see of the bimini frame, it looks pretty good and I'd keep it. I removed the canvas from mine and washed the frame separate from the material and that was a big improvement. Don't get too aggressive when cleaning the frame, it has an anodized surface and you'll want to preserve that as much as possible. Some diluted Simple Green or Purple Power will suffice.
The dash? If you can get a replacement it will have to come from a Benny dealer, but I wouldn't hold my breath. Have you looked at the wiring on the gauges under the helm? It's intimidating to say the least and not something I would be eager to dive in to. I suggest you pull the wood panel that's there and see what's behind it. The original Fishfinder 85 was surface mounted and the hole for it wasn't very big. You can see what I'm talking about if you scroll down on this page of my Coon Toon thread.
 club.benningtonmarine.com
It's possible that you might just need to install a newer ff unit in a cleaner fashion if the po didn't cut the dash all to hell. If he did, I'd consider installing an aluminum or stainless plate on the surface and going from there.
club.benningtonmarine.com
It's possible that you might just need to install a newer ff unit in a cleaner fashion if the po didn't cut the dash all to hell. If he did, I'd consider installing an aluminum or stainless plate on the surface and going from there.
The rub rail and panel railing would have to be oem replacement from Bennington. Again, availability might be an issue. I would imagine the rub rail would be easier to source, but would require quite a bit of work to replace. The top rail is part of the largest panel on that side, and it's not like you can remove a portion of it since it's all welded together. If it were me, I'd box it in with strips of aluminum, mount a cup or rod holder over the repair, and call it a day.
Just my opinion, but replacing every part of your boat that shows wear with Bennington sourced parts doesn't make financial sense. It's an old boat, clean up what you can and learn to live with what you can't.
The dash? If you can get a replacement it will have to come from a Benny dealer, but I wouldn't hold my breath. Have you looked at the wiring on the gauges under the helm? It's intimidating to say the least and not something I would be eager to dive in to. I suggest you pull the wood panel that's there and see what's behind it. The original Fishfinder 85 was surface mounted and the hole for it wasn't very big. You can see what I'm talking about if you scroll down on this page of my Coon Toon thread.
The Coon Toon Project (pic heavy)
I was looking at the polished pontoons as well. Can you describe the process you used to achieve this? The polished pontoons look amazing, enjoy your new boat!!!
club.benningtonmarine.com
The rub rail and panel railing would have to be oem replacement from Bennington. Again, availability might be an issue. I would imagine the rub rail would be easier to source, but would require quite a bit of work to replace. The top rail is part of the largest panel on that side, and it's not like you can remove a portion of it since it's all welded together. If it were me, I'd box it in with strips of aluminum, mount a cup or rod holder over the repair, and call it a day.
Just my opinion, but replacing every part of your boat that shows wear with Bennington sourced parts doesn't make financial sense. It's an old boat, clean up what you can and learn to live with what you can't.
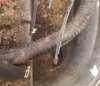
So I took the back live well out, found the issue, it appears one of the intake hoses has been rubbed so severely that it split in two.
Now I've attempted to run a snake thru the fron live well tubing....I come to a point it will not go any further but I'm not coming out at the rear live well hole..thought I was maybe hitting the T . So I went to the back of the boat and again ran the snake up tjru the back hose ( its cut away from the pump) and again only will go so far...impossible there are 2 tees, if I could get the snake thru both of these, I would be able to run new tubing, but at its end.. any suggestions? Mark....
Now I've attempted to run a snake thru the fron live well tubing....I come to a point it will not go any further but I'm not coming out at the rear live well hole..thought I was maybe hitting the T . So I went to the back of the boat and again ran the snake up tjru the back hose ( its cut away from the pump) and again only will go so far...impossible there are 2 tees, if I could get the snake thru both of these, I would be able to run new tubing, but at its end.. any suggestions? Mark....
Attachments
Maynard G. Krebs
Well-Known Member
- Messages
- 307
- Reaction score
- 316
Hard to diagnose the problem since it's no longer oem and was put together by someone that shouldn't have. At this point I'd put compressed air in the lines trying to determine if it's blocked or at least try to listen for air coming out where it shouldn't be. If you don't have an air compressor, then maybe try a shop vac to see if you're getting suction at the other end.
SEMPERFI8387
Moderator
Check www.greatlakesskipper.com
I dash bezels similar to yours on there every so often. As for running tubing, remove the side trim at the top of the toons, and you can run the tubing back through the “m“ brackets.
I dash bezels similar to yours on there every so often. As for running tubing, remove the side trim at the top of the toons, and you can run the tubing back through the “m“ brackets.